
Generally, the Ultimaker printer will notify you of a problem on display. On the Ultimaker support website there is a list of the most common issues and how to fix them. You can search the error code on the website for more information and a solution.
However, below are some common problems that are not included in the Ultimaker support database:
- The printer has stopped mid-print.
- The print doesn’t stick to the print bed.
- The print layers are not correctly connected.
- The printer nozzle will not touch the plate.
- Other CURA errors.
- Additional advice.
In what follows, we will discuss how to troubleshoot all of these problems in more detail.
1) The printer has stopped mid-print.
Step 1: Check to see if the spool has run out of material.
If the printer has been printing for a while, it is crucial to check that it still has enough material to finish the orthosis.
Note: There is no alarm to warn the user when the printer has run out of material, so it is important to remember to check this regularly.
If there is no material left on the spool, follow the steps below:
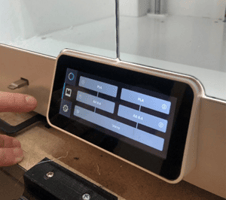
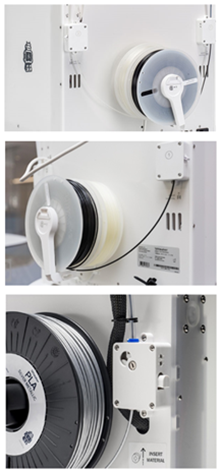
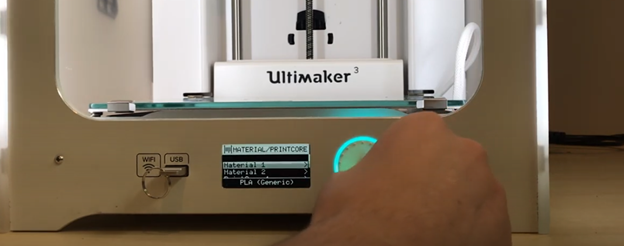
- Press the second tab on the machine screen and select the material and select the “edit” option. The machine nozzle will then heat up, and the remaining material will come out on its own.
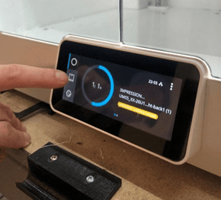
- Once the filament has been removed from the guide, place a new spool on the spool holder. Cut the end of the filament and put it in the guide. Make sure to properly open the guide's jaw so that the machine can hold the new filament.
|
Unloading fillament |
Loading fillament |
|
|
 |
- Once inserted into the guide with the jaw closed, return to the control screen. The filament will then be reintroduced to the nozzle.
- Once in place, check that the nozzle extrudes correctly, and press “continue”. Then return to the first tab and try printing again.
- Press the second tab on the machine screen and select the material
watch a tutorial here.
Step 2: Check for an unwounded spool.
Sometimes this error occurs as the manufacturer will accidentally poorly wind the filament onto the spool, creating knots that prevent the extruder from being able to pull on the filament. This causes the printer to think that the spool of material is empty.
Note: Always check that the filament is well wound prior to printing.
Step 3: Check to see if the printer nozzle is blocked.
If there is enough material left on the spool, and the printer is not printing, check that the filament has not been damaged. To do this, stop the print job currently in process, open the jaw and the guide tube and pull on the filament. If the filament is damaged, it is because the printer nozzle has become blocked.
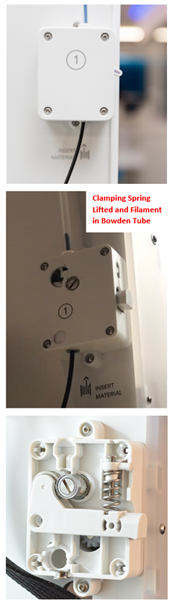
Signs of a blocked nozzle or incorrectly installed print head:
Note: More information here.
To unblock the nozzle:
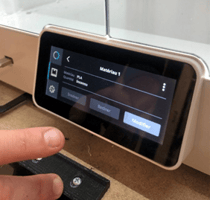
- Go to the second tab and select malfunctioning PrintCore. Select “define PrintCore temperature”, and increase the temperature to 250°C.
- Once the nozzle is heated and after retracting the Bowden extruder, feed a bit of the material into the PrintCore.
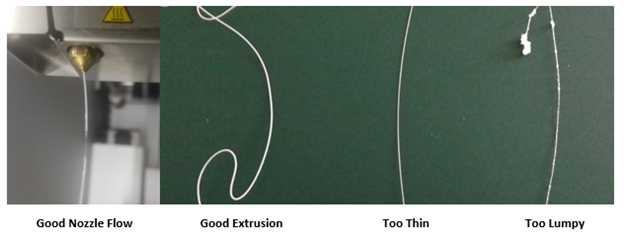
- Alternate between pressing and pumping the filament through the print head for a few seconds to see if extrusion is possible.
-
Then, reduce the temperature to about 85°C when using PLA or 160°C when using ABS, and wait for the nozzle to cool. Maintain pressure on the filament for the whole process of cooling down as it prevents air bubbles from forming in the material as it cools down and keeps the nuzzle full until it has cooled down enough that the plastic no longer dribbles out. This usually occurs at around 140°C, but it does vary.
- Once the nozzle reaches the set temperature, remove the filament. If the filament is stretched, the temperature was too high, and if it is tuck, it was too low. Correctly removing the filament should leave you with an impression of the nozzle.
- Any debris will be represented by a mangled filament. Repeat the process until the filament you remove is clean, and with no impression of any debris.
Note: If you are printing a lot of PETG, the ventilator can become blocked as small PETG filaments unroll and get stuck. To avoid this, double-check the ventilator between each print to ensure that no filaments remain. These can be removed with a set of tweezers.
An additional cleaning guide can be found here.
2) The print doesn’t stick to the print bed.
If the print unsticks from the plateau, this can be due to:
- There is no layer of glue on the plate, or the glue has not been sufficiently cooled.
- There is an error in the G-Code, in which plate adhesion was activated due to a border.
In general, when this happens, as the print will increase in height, the more the nozzle risks touching it and dragging the whole print with it. While this might not sound like a serious issue, it can significantly negatively affect the printed item, so make sure that these errors have been avoided. There is no way to fix this other than to restart the whole print.
3) The print layers are not correctly connected.
There are two potential types of error here:
The layers do not stick together – under-extrusion.
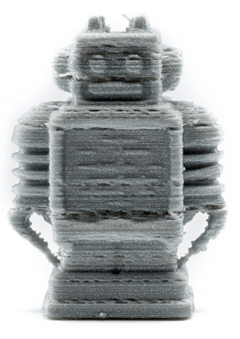
This problem is only noticeable once the model is finished and softer areas appear. Some spots may also appear hollow inside the print. Unfortunately, in this case, the only solution is to restart the model after having cleaned the PrintCore and the plate.
There are many reasons why your printer might be under-extruding. The main ones include:
- Wrong temperature for the extruded material – (check your material settings are correct)
- Tangled filament
- Moisture absorption of the filament
- Feeder issues:
-
- Material not moving- this is due to either friction in the bowden hot-end, or lack of grip of the feeder on the material. This can be diagnosed by taking the material out of the 3D printer and checking for visible marks. If the material is smooth, feeder tension is too low.
- Material grinding- this could be due to either too much tension on the feeder or it can also be caused by a blockage in the hot-end. When your filament is ground down, it’s important to remove the material from the Ultimaker, clean the feeder and check the feeder tension before continuing.
- Feeder skipping could be due to blocked Bowden tube, or due to the coiled filament leading to an increase of friction in the tube causing problems with your print
The layers progressively shift apart.
Often, this error is not severe (most shifts are small, and do not affect the overall end result). The shifts can, however, stack up if not noticed in time, leading to the whole print becoming skewed. If that case, there is no way of fixing it other than starting the print again.
If your print begins to lean, the usual cause is friction. In this case, check the feeder and make sure that the tension in the filament is not too high or too low, following the guide in the previous part (Feeder issues).
Additionally, make sure that the pulleys on the stepper motors that the belts ride over are not touching the side of the printer, and move them if they are.
4) The printer nozzle will not touch the plate.
In this case, the nozzle is unable to touch the plate to deposit the filament. This has a few different causes:
- Dirty Nozzle
- Dirty plate
- Poor Levelling
- Levelling sensor error
Step 1: Check if the nozzle is not clean.
When the nozzle is dirty, the automatic calibration can be flawed. Therefore, the nozzles should be brushed with a wire brush. If that does not clean the nozzle, the material may have solidified. To get it out, heat the nozzle and follow the blocked nozzle procedure.
To unblock the nozzle:
- Go to the second tab and select malfunctioning PrintCore. Select “define PrintCore temperature”, and increase the temperature to 250°C.
- Once the nozzle is heated and after retracting the Bowden extruder, feed a bit of the material into the PrintCore.
- Alternate between pressing and pumping the filament through the print head for a few seconds to see if extrusion is possible.
-
Then, reduce the temperature to about 85°C when using PLA or 160°C when using ABS, and wait for the nozzle to cool. Maintain pressure on the filament for the whole process of cooling down as it prevents air bubbles from forming in the material as it cools down and keeps the nuzzle full until it has cooled down enough that the plastic no longer dribbles out. This usually occurs at around 140°C, but it does vary.
- Once the nozzle reaches the set temperature, remove the filament. If the filament is stretched, the temperature was too high, and if it is tuck, it was too low. Correctly removing the filament should leave you with an impression of the nozzle.
- Any debris will be represented by a mangled filament. Repeat the process until the filament you remove is clean, and with no impression of any debris.
Note: If you are printing a lot of PETG, the ventilator can become blocked as tiny parts of PETG filaments unroll and get stuck. To avoid this, double-check the ventilator between each print to ensure that no filaments got stuck. These can be removed with a set of tweezers.
You can find an additional cleaning guide here.
Step 2: Check if the plate is not clean.
If the problem persists, it may be that the plate is dirty and that excessive deposits are preventing calibration. You can use soap to clean the plate.
Step 3: Check the levelling.
If neither of the above-mentioned solutions fix the problem, it may be that the automatic levelling is decalibrated. Manually levelling the plate will probably solve the issue. To do this:
- You need to move the nozzle to each corner of the tray and pass a sheet of paper between the nozzle and the tray at each corner.
- The foil should scratch slightly under the nozzle, but there should not be too much resistance.
Step 4: Check for levelling sensor error.
If all of the previous steps fail:
- Press the third tab on the screen and maintenance.
- Then, in diagnostics, select the option “launch plate diagnostics”.
5) CURA Errors
A) STL File Slicing Issues
If it looks as though the model fits on the plate, but that the CURA does not want to slice it, this could be because of the skirt. Check that it does not go past the plate, then try again.
B) The supports of another material do not print.
If, during your print, the supports of a different material to one used prior do not print, double check that your material selection in CURA is the same as the material currently being used. Additionally, make sure that the second nozzle is correctly activated, and that the supports have been correctly activated, and that the second nozzle has been selected.
6) Additional Advices
A) Print Material
- Try not to keep a dedicated nozzle for each type of material.
- Try to dedicate a PrintCore for each type of material.
- If you want to print everything with just one nozzle, be sure to clean it between each material. (If you print all your prints with a single nozzle and you change the material for each print, the nozzle will easily become clogged.)
B) Errors
- For most of these errors, there is no warning system in place. The display does notify about the problem, and there is no sound warning. So, it is not easy to detect these problems on time. Please stay vigilant and make sure to keep checking that the printer is printing correctly.
- Issues related to the error messages can be found on the Cura site.