
Tips and tricks for scanning feet, how to get the best results with fewer modifications to perform after scanning
Before starting to scan, click on create a new order. Here is an article explaining in detail how to do that.
Step 1: Establish the right environment
The quality of the scan depends on the lighting conditions you set up. A well-lit room is the key to a successful scan. Here you find a more detailed description on how you can change the lighting settings in your environment.
Step 2: Positioning of the patient
Start by helping your patient take the right position. Here are some guidelines:
- Make sure your patient is seated comfortably, either on an ordinary chair or in their wheelchair.
- Remove clothing from the limb you want to scan.
- Put a see-through foot-stand in front of the patient. Working with a stand will give you a weighted measurement of the foot, by flattening out the sole of the foot. The stand will make it easier to put the ankle exactly at a 90° angle, put pressure on the sole so the foot will go more in a pronated stand and allow you to scan the sole without having to merch two scans together.
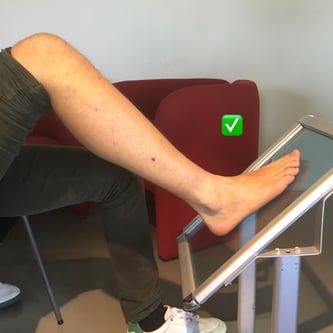
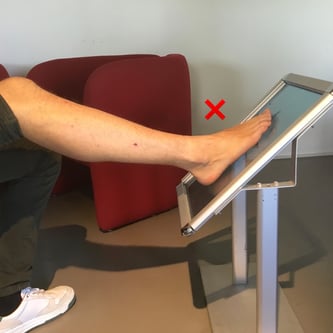
Tip: If you place the stand closer to the patient, the knee will be bent more, making it easier to put more dorsiflexion in the ankle and make it easier to get that 90° angle.
We recommend using the weighted scanning method, but you can also use a non-weighted method. Here are some differences between the methods summed up:
Weighted vs non-weighted scanning
Tip: Read this article for more examples on positioning the lower limb!
You’re now ready to take the 3D scan!
Step 3: Set up the 3D scan
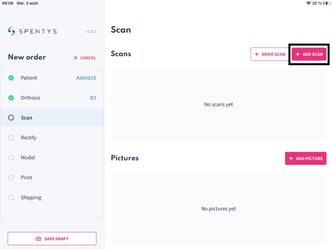
In order to add your patient’s scan, tap the Add scan button. Make sure the scanner is plugged into your iPad before starting the scanning process.
|
You can also add pictures by tapping the Add Picture button. E.g.:
|
 |
This allows to store as much information as possible and can help the Spentys modellers to have a better visualization of the scan and the environment in which it was made in case you plan to opt for the design service.
The quality of the scan is crucial to provide a perfect fitting orthosis. Here is a tutorial on how to create the perfect scan.
First, make sure that the foot and lower leg is visible on the iPad before initiating the scanning process. The perfect starting distance is 60 cm. The app will indicate at the top of your screen at what distance the body part is positioned. The circle will change its colour to green when you are at the perfect scanning distance and to red when you’re too far or too close to the object.
Note: Changing the distance between the scanner and the patient is allowed but keep in mind that 60 cm will give you the best quality.
Make sure the foot and lower leg are positioned inside of the indicative lines. For scanning the foot, the indicatives lines will form a cube. The size of the cube can be changed manually in the app to fit the entire body part. Check that the entire foot gets colourized in the app.
You're now ready to start scanning the foot.
Step 4: Start 3D scanning
Remember to move slowly around the body. This gives our software the time to process the environment and immediately display the overall shapes of the scan. Make sure the entire foot is coloured in white before stopping the scan, indicating that the entire foot and lower leg has been scanned.
Tip: Start at the posterior side of the lower leg/foot and turn around the limb. Try to do this in one take to avoid going back and forth while scanning.
Taking a scan of the foot and lower leg is not easy. Especially to get the sole of the foot and catching every angle of the limb. Practice makes perfect!
You can also download the Instruction Manual: A Practical Guide to Mastering the Art of Scanning