
Adding landmarks, will allow you to indicate certain points on the scan to specify certain aspects of your scan. From bony structures to axial pivot points in the joints.
When rectifying the scan, you will be asked to position landmarks. Once right after cleaning up the scan and another time during the pose step.
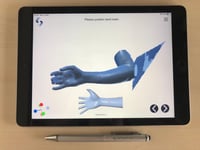
On the lower middle part of your screen, there will be a reference model. The small red dot indicates precisely where you should put the landmark points.
Start by pivoting the scan to the correct plane. You can pivot the model by using one finger and sliding over the screen in the direction you want to go. With two fingers you can translate the model or zoom in/out on the model.
Just by clicking on the scan, there will appear a red dot on your scan at the place you touched. This will indicate the placement of the asked landmark. When placing the landmarks, try to be as precise as possible as the reference model indicates.
Tip: We recommend using a touchscreen pencil for more precise placement of the landmarks.