
BEFORE SCANNING
Step 1: Establish the Right Environment
The quality of the scan depends on the lighting conditions you set up. The key to good lighting is a strong diffused light source, which can be achieved in various ways.
 |
Scanning in a room close to a window, you can use natural light on an overcast day. |
| When there is no natural light, you should scan in a well-illuminated room with a uniformly diffused white light. | |
 |
If your floor is reflecting light into the scanner, cover it with a (white) blanket or a carpet. |
Tip: Are you still having trouble getting the lighting just right for your scans? Consider investing in a small studio light setup (permanent lights for video production, not flashlights for photography). You can easily find some affordable options online. If you want to go totally portable, you can use a LED mounted to the headphone jack of your iPad.
Step 2: Calibrating the Scanner
Calibrating the scanner is an important step of the preparation process, having a large impact on the scanner’s level of accuracy; the better the calibration, the more accurate the 3D scans will be. The quality of the 3D scan can degrade over time because of temperatures fluctuations, dust, dropping or rough shaking of the device. In this case, the 3D scanner must be calibrated again.
When should you (re-)calibrate your device?
- When the app is first installed.
- Once a month for good practice.
- Whenever you have the feeling the scanning quality is inferior.

- When the app displays the following message: 'This app requires an iOS device with a supported bracket', download the free Calibrator App.

Step 3: Positioning of the Patient
Here are some general guidelines to get you started:
| Removing clothing from the body part you want to scan, exposing the naked skin to the scanner. Remove excessive body hair (for example on male legs), this can affect the scan. | |
| Position the body part of the patient in the desired immobilization position. The shape of the orthopaedic device is identical to the 3D scan of the body part. So, take your time to make sure the patient is striking the desired pose. |
Step 4: Positioning the scanner
| Make sure that the body part you want to scan is visible on the iPad before initiating the scanning process. The perfect starting distance is 60 cm, try moving back and forth to get to a suitable distance. How can you know you are at the right distance? In the app a circle will appear that indicates at what distance the body part is positioned. The circle will change its colour to green when you are at the perfect scanning distance. | 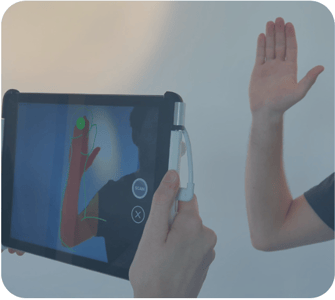 |
| The body part you want to scan needs to be positioned inside of the indicative lines. For most scans this will be a cube. The size of the cube can be changed manually in the app to fit the entire body part. For some orthoses, specific indicative lines are pre-drawn (e.g., forearm). Check that the entire body part gets colourized in the app. | 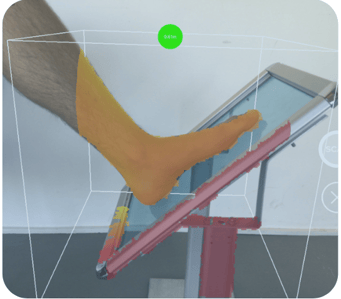 |
| Keep the iPad at the same height as the patient’s body part while scanning. In most applications the angle of inclination of the iPad should be identical to the angle on inclination of the patient’s body part. | |
DURING SCANNING
When all the precautionary measures have been successfully implemented and the distance indicating the circle is green, you are ready to start scanning.
Here are some tips for the scanning process to achieve the best outcomes:
 |
Changing the distance between the scanner and the patient is allowed but keep in mind that 60 cm will give you the best quality. |
 |
Move slowly while turning around the body. Our software immediately displays the overall shapes as visual guidelines. Nevertheless, be aware there is a small delay to construct all details on the 3D model. |
 |
Make sure the entire body part is coloured in white before stopping the scan, indicating that the entire body part has been scanned. |
 |
The patient must stay still during the scan. A sudden movement can decrease the quality of the scan. |
The scanning process is completed by uploading the scan to the Spentys platform and adding additional patient data if the scan needs to be modified .
Congratulations! You have now successfully created your first scan.