
How to design an A1 model
- Enter the patient’s name: JOHN TEST, age 35, pathology: post-operative treatment + fracture of the scafoïd bone and other important information.
- First, select the right underarm that you would like to immobilize. To design an A1-splint you will need to select the hand, wrist, and lower arm. After selecting the segments, you will be able to select the desired splint.
- Before scanning the patient, remember to have enough space around the patient and to make sure you have enough light to make the scan (BUT avoid scanning against bright sunlight).
- Scan the right arm to immobilize it.
- Crop the scan to 155mm (also the length for the splint). Rectify the position of the wrist. First, correct the position to neutral. After, you’ll be able to adjust the angulation to 5 degrees. Add 1,5 mm on the Proc. Styloïd, flatten the handpalm by using the flattening tool.
- Select the desired printing method: MJF PA12
- Select modeling in Autoforma and launch the Forma application:
- Click on ‘fit’ and place the landmarks on the indicated areas.
-
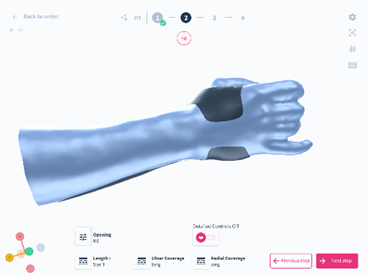
- Once the template is fitted on the scan, make sure the dorsal opening of the splint is at 0.5mm, the radial coverage is on ‘short’, the ulnar coverage is on ‘medium’ and the splint has the ‘size 2’ length.
-
- Use the controlled details button to smoothen the sharp edges if necessary
-
- Create 6 beltloops, make sure there is 1 strap over the hand (15mm), 1 over the wrist (25mm), and 1 over the forearm (35mm). Engrave the splint on the base of the splint.
- Make sure the global thickness is 2,5mm. Make sure there is 1,5mm of Global offset.
- Enter the shipping/invoicing address.
- To complete the order, press the ‘submit order’ button. You will be able to access the order on the platform.
Congratulations, you just created an A1 model in AutoForma.