
Here is a step by step guide that will help you to achieve your first order after your onboarding with Spentys
Step 1 : Complete the patient details.
Step 2 : Choose the correct limb to scan and the correct segments, according to the A1-model.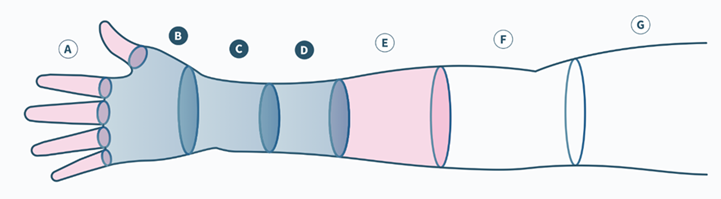
Step 3 : Take a useable scan and add some pictures of the affected limb in different perspectives.
Step 4 : Correct your scan:
- Crop off the scan at 2/3 of the forearm.
- Change the position of the scan. First, set the articulation to the neutral pose. After that, modify the scan to 5° extra extension.
- Sculpt the scan. Add 2mm local offset on the styloid.
Step 5 : Choose the Spentys Designer option and share your preferences:
- Model review: Do you want to receive a visualisation of the 3D model before it gets printed? This may affect the delivery time.
- Closing system: Yes/No. If yes, provide us with the amount of beltloops and the desired width of the betloops.
- Global Offset (mm): Do you want to have some space between the skin and the splint?
- Alveoles: Would like to have alveoles/holes in the model? None/Small/Large
Step 6 : Choose the desired printing process:
- Print your orthosis at Spentys.
- Use your own 3D printer and manufacture your orthosis by yourself.
Step 7 : Provide us with the correct shipping and invoicing address.
Congratulations! You just did your first order with the app. You are now able to use 3D technologies with A1 Splints for your patients.